まずは同じようにTableView、Text Field、Push Buttonをポンポンと置いていく。
Table ViewのContent ModeをView Basedにする。
Cell Basedの時はColumnの下にText Cellがあっただけでしたが、
View Basedの場合はColumn毎にTableCellViewがあります。
ということで、Table ColumnとTableCellViewのIdentifierを設定。
同じ名前の方が後々楽かも。
もう一つのColumnも同じように設定。
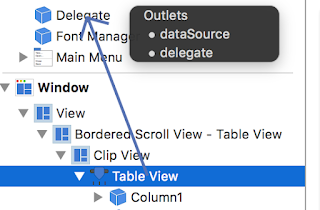
キーボードのcontrolキーを押しながら、こんな風にマウスドラッグして、
Table ViewのdelegateとdataSourceをdelegateする。
NSTableViewDelegate, NSTableViewDataSourceを追加
Table View, Text Field, Push Buttonを接続
で、コーディングしていく。最終的には次のようなものになった。
import Cocoa
@NSApplicationMain
class AppDelegate: NSObject, NSApplicationDelegate, NSTableViewDataSource, NSTableViewDelegate {
@IBOutlet weak var window: NSWindow!
@IBOutlet weak var tableView: NSTableView!
@IBOutlet weak var txtCell1: NSTextField!
@IBOutlet weak var txtCell2: NSTextField!
@IBOutlet weak var btnPost: NSButton!
//TableViewで扱う値が入った配列
var tableArray:[NSDictionary] = []
//行数(配列の数)を返す
func numberOfRowsInTableView(tableView: NSTableView) -> Int
{
return self.tableArray.count
}
//配列更新時に呼び出される カラムのidentifierを元に、そのカラムのTableCellView内のTextFieldの内容を変更
func tableView(tableView: NSTableView, viewForTableColumn tableColumn: NSTableColumn?, row: Int) -> NSView?
{
let cellView = tableView.makeViewWithIdentifier(tableColumn!.identifier, owner: self) as! NSTableCellView
cellView.textField?.stringValue = tableArray[row][tableColumn!.identifier] as! String
return cellView
}
@IBAction func btnPost(sender: NSButton) {
self.tableArray.append(["tableColumn1": self.txtCell1.stringValue, "tableColumn2": self.txtCell2.stringValue])
self.tableView.reloadData()
}
func applicationDidFinishLaunching(aNotification: NSNotification) {
// Insert code here to initialize your application
}
func applicationWillTerminate(aNotification: NSNotification) {
// Insert code here to tear down your application
}
}
Cell Basedの時は、numberOfRowsInTableView と objectValueForTableColumn が必須メソッドだったけれど、
View Basedは、numberOfRowsInTableView と viewForTableColumn が必須メソッドらしい。


